Threading is a part modification process that involves using a die tool or other appropriate tools to create a threaded hole on a part. These holes functions in connecting two parts. Hence, threaded components and parts are important in industries such as the automotive and medical part manufacturing industry.
Threading a hole requires understanding the process, its requirement, machines, etc. As a result, the process can be challenging. Therefore, this article will help people who want to thread a hole as it extensively discusses hole threading, how to thread a hole, and other related things.
What Are Threaded Holes?

A threaded hole is a circular hole with an internal thread obtained by drilling the part using a die tool. Creating the internal threading is achievable using tapping, which is important when you cannot use bolts and nuts. Threaded holes are also referred to as tapped holes, i.e., holes suitable for connecting two parts using fasteners.
Part manufacturers thread hole due to the following functions below:
· Connecting Mechanism
They serve as a connecting mechanism for parts using bolts or nuts. On the one hand, threading prevents the fastener from losing during use. On the other hand, they allow the removal of the fastener when necessary.
· Easy for Shipping
Threading a hole in a part can aid in faster packaging and a more compact package. As a result, this reduces the problems with shipping, such as dimension considerations.
Types of Threaded Holes
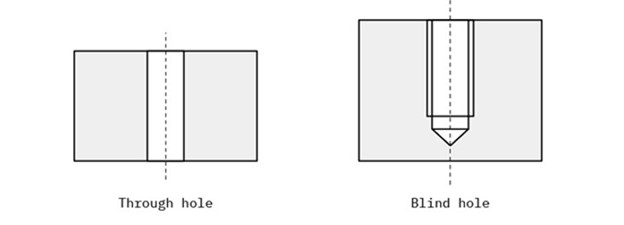
Based on the hole depth and opening, there are two major types of hole threading. Here are their characteristics:
· Blind Holes
Blind holes do not extend through the part you are drilling. They can either have a flat bottom with the use of an end mill or a cone-shaped bottom with the use of a conventional drill.
· Through Holes
Through holes penetrate the workpiece completely. As a result, these holes have two openings on the opposite sides of a workpiece.
How To Create Threaded Holes
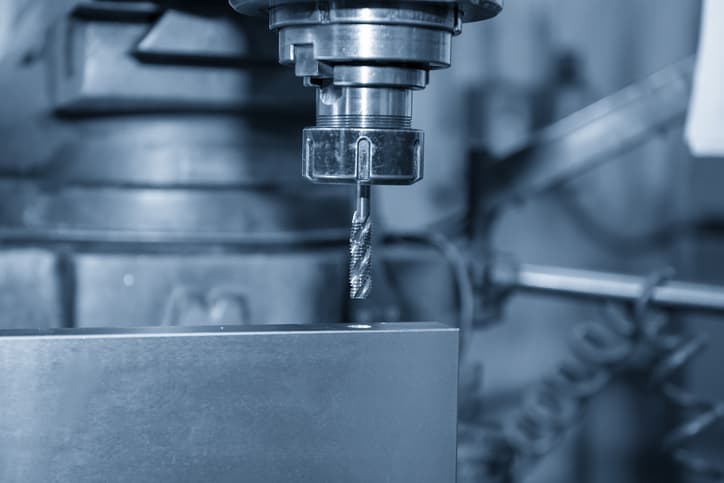
With the right tools and knowledge, threading can be a very simple process. With the steps below, you can easily cut internal threads into your parts:
· Step #1: Create A Cored Hole
The first step in making a threaded hole is to cut a hole for a thread using a twist drill with eyes toward achieving the desired hole diameter. Here, you should ensure you use the right drill to achieve not only the diameter by the required depth.
Note: You can also improve the hole surface finish by applying a cutting spray to the drilling tool before making the hole for the thread.
· Step #2: Chamfer The Hole
Chamfering is a process that involves using a drill bit that moves in the chuck slightly until it touches the edge of the hole. This process helps align the bolt and achieve a smooth threading process. As a result, chamfering can improve the tool’s lifespan and prevent the formation of raised burr.
· Step #3: Straighten The Hole By Drilling
This involves using a drill and a motor to straighten the created hole. There are a few things to take note of under this step:
- Bolt size vs. Hole Size: The bolt size will determine the hole size before tapping. Typically, the bolt’s diameter is bigger than the drilled hole because tapping will increase the hole size later. Also, note that a standard table matches the drilling tool size to the bolt size, which can help you avoid mistakes.
- Going too deep: If you don’t want to create a thorough threaded hole, you must be careful of the hole depth. As a result, you should watch out for the type of tap you use as it will influence the hole depth. For instance, a taper tap does not produce full threads. As a result, when using one, the hole needs to be deep.
· Step #4: Tap The Drilled Hole
Tapping helps create internal threads in the hole so that a fastener can stay firm. It involves turning the tap bit in a clockwise direction. However, for every 360° clockwise rotation, make a 180° anticlockwise rotation to prevent the accumulation of chips and make room for cutting teeth.
Depending on the chamfer size, three taps are used for tapping holes in part manufacturing.
– Taper Tap
A taper tap is suitable for working with hard materials due to its strength and cutting pressure. It is the most coming tapping tool characterized by six to seven cutting teeth that taper from the tip. Taper taps are also suitable for working on blind holes. However, using this tap to finish threading is not advisable because the first ten threads might not fully form.
– Plug Tap
The plug tap is more suitable for a deep and thorough threaded hole. Its mechanism involves a progressive cutting motion that cuts the internal threads gradually. Hence it uses as by machinists after the taper tap.
Note: it is not advisable to use plug taps when the drilled hole is near the workpiece edge. This can lead to breakage when the cutting teeth reach the edge. Furthermore, the taps are unsuitable for very small holes.
– Bottoming Tap
Bottoming tap has one or two cutting teeth at the beginning of the tap. You use them when the hole needs to be very deep. Using the bottoming tap depends on the hole’s desired length. Machinists usually start with a taper or plug tap and end with a bottoming tap to achieve good threading.
Threading or tapping hole requires understanding the necessary processes and machines and cooperating with the right services. At RapidDirect, with our state-of-the-art equipment and factories, and expert teams, we can help you make custom parts with threaded holes
Considerations for Making A Successful Threaded Hole
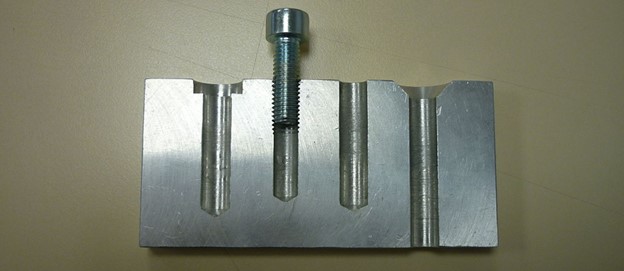
Making a successfully threaded hole depends on the properties of the material you are working on, hole characteristics, and several other parameters explained below:
· Hardness Of The Material
The harder a workpiece, the greater the force you need to drill and tap the hole. For example, to thread a hole in hardened steel, you can use a tap made of carbide due to its high heat and wear resistance. To thread a hole in a hard material, you can imbibe the following:
- Reduce the cutting speed
- Cut slowly under pressure
- Apply a lubricant to the tap tool to ease Threading and prevent tool and material damage
· Keep With Standard Thread Size
The thread size you use may affect the entire threading process. These standard sizes make it easy for the thread to fit in the part accurately.
You can use the British standard, the National (American) Standard, or Metric Thread (ISO) standard. The metric thread standard is the most common, with thread sizes coming in a corresponding pitch and diameter. For example, M6×1.00 has a bolt diameter of 6mm and a diameter of 1.00 between the threads. Other common metric sizes include M10×1.50 and M12×1.75.
· Ensure Optimal Depth Of The Hole
Achieving the desired hole depth can be difficult, especially for threaded blind holes (a through hole is easier due to the lower restriction). As a result, you need to reduce the cutting speed or feed rate to avoid going too deep or not going deep enough.
· Choose Suitable Machinery
Using the right tool can determine the success of any manufacturing process.
You can use a cutting or forming tap to make a threaded hole. Though both can create internal threads, their mechanism is different, and your choice depends on the material texture and bolt diameter factors.
- Cutting Tap: These tools cut away the materials to create the internal thread leaving a space where the screw thread would fit in.
- Forming Tap: Unlike cutting taps, they roll the material to create threads. As a result, there is no chip formation, and the process is highly efficient. Furthermore, it is applicable for threading parts made from soft materials like aluminum and brass.
· Angled Surfaces
When working with an angled surface, the tapping tool can slide down the surface or break as it cannot withstand bending stress. As a result, working with angled surfaces should be done with care. For example, when working with an angled surface, you should mill a pocket to provide the needed flat surface for the tool.
· Correct Positioning
Threading should occur in the correct position for an efficient and effective process. Threading position can be anywhere, e.g., middle and close to the edge. However, it would be best to be careful during Threading close to the edge, as mistakes during Threading can ruin the part surface finish and break the tapping tool.
Comparing Threaded Holes and Tapped Holes
A tapped hole is similar to a threaded hole, although they use different tools. On the one hand, tapping a hole is achievable using a tapping tool. On the other hand, you need a die to create threads in a hole. Below is a comparison of both holes:
· Speed
In terms of the speed of operation, tapped holes take relatively less time to cut threads. However, tapping may require different tap types for just a single hole. Therefore, such holes that require switching taps will have a longer production time.
· Flexibility
On the one hand, tapping has lesser flexibility because it is impossible to alter the thread fit after the process ends. On the other hand, Threading is more flexible as you can modify the thread size. This means the tapped hole has a fixed location and size after threading.
· Cost
The process of making threads on a surface helps to save costs and time. One can make holes with varying diameters and depths with a single thread milling. On the other hand, using different tap tools for a single hole will increase tooling costs. Furthermore, the tooling cost may increase due to damage. Aside from the cost, tool damage can also lead to broken taps, although there are now ways to remove broken taps and continue threading.
· Material
Though you can create threaded and tapped holes on many engineering materials, a tapping tool has an edge in very hard ones. You can make tap holes on even hardened steel with the right tool.
Get Prototypes and Parts With Threaded Holes
Threading is achievable using several machines and processes. However, CNC machining is a common manufacturing process for making a threaded hole. RapidDirect offers CNC machining services that cater to your part manufacturing needs, from prototyping to full production. Our experts can work with many materials to create threaded holes of different diameters and depths. Furthermore, we have the experience and mindset to make your ideas to reality and easily make your custom past parts.
With us at RapidDirect, machining is easy. Using our design guide for CNC machining, you will surely get full advantage of our manufacturing services. Furthermore, you can upload your design files on our instant quoting platform. We will review the design and provide free DFM feedback for the design. Make us your custom part manufacturer and get your custom-made parts in a few days at a competitive price.
Conclusion
Threading a hole is a connecting mechanism that allows you to cut threads in holes when the screw cannot cut through the material easily. The process can be challenging. As a result, this article discussed the process and things you need to consider concerning part manufacturing. Feel free to contact us if you have further questions regarding the process of hole threading.
FAQ
Threading is applicable for creating an additional grip for fasteners to join two parts together. It is suitable for working with hard materials when the screw threads cannot cut them directly.
Yes, you can cut threads in an existing hole. Since you have an existing hole, you can thread it using a hand tap or a machine tap.
Yes, you can cut threads with a die tool. This process involves the use of the tap and dies set. The tap creates internal threads in the hole while the die cuts external threads on fasteners like bolts and nuts.
