Screws and threads are among the most popular fasteners in the world as they allow convenient joining in multiple complicated assemblies. For 3D-printed parts, threads are an important element that can allow the use of off-the-shelf screws and fasteners. However, 3d printing threads and incorporating them in the design can be a challenge without the right process.
This article brushes over the basics of 3d printed threads and discusses the best practices that deliver consistent results without any added complexities.
Before moving on to the details of 3D-printed threads, it’s important to shed some light on why the industry prefers using them.
Firstly, 3d printing threads allow the creation of even the most complex designs because there are only a few limitations to the technology. Similarly, other methods like machining and casting have several issues, internal materialistic flaws, and other quality issues while creating complex, integrated shapes.
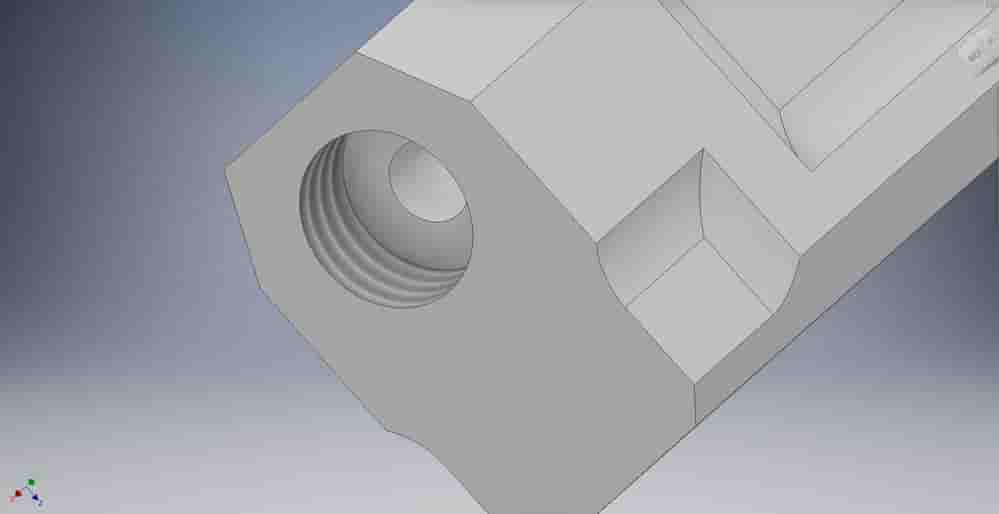
3D printers, however, build parts directly in layers which allows better flexibility and performance. Moreover, 3D-printed screw threads don’t always have to be on the surface like other manufacturing methods. They can be hidden in the middle or other areas where it’s extremely difficult to add threads using other methods.
Additional to the aforementioned advantages, another benefit of 3d printing threads is surface finishing. Furthermore, these surfaces are quite smooth and require little to no post-processing. Moreover, other processes like casting and machining require significant resources to prepare the part through grinding, turning, and other operations. However, the process becomes different in the case of additive manufacturing where there is no need for further post-processing once the part is completed.
Additionally, another benefit of using 3D printers is the precision, consistency, and high tolerance. Some applications demand all these because of their sensitivity and using 3D printing seems to be the only viable answer.
One more favorable thing about using 3D-printed screw threads and other parts is the cost-effectiveness for small-scale setups. Furthermore, using 3d printing for prototyping is one of the most important phases of any design project, and using traditional machining or other methods can consume a lot of time and resources. Using 3D printing instead can save both time and significant resources which facilitate multiple iterations and help optimize the designs to improve the overall performance of the project.
Before moving on to the incorporation of internal and external threads in a 3D printing design, it’s important to discuss some of the most common design terms anyone associated with the field should know about.
| Term | Description |
| External or internal threads | The only difference between these threads is their location. Internal threads remain within the surface and can’t be seen. External threads, however, remain on the surface. Bolts and nuts are the perfect example of that where threads on the bolt are external while nuts have internal threads. |
| Pitch | This refers to the distance between the two adjacent points on a screw. |
| Major diameter | The overall diameter of the screw starts from the furthest end of the screw to the center of the screw. |
| Minor diameter | The diameter of the screw without considering the dimensions of the thread. Moreover, it’s also called root diameter. |
| Thread axis | The imaginary line passes through the center of the cylinder in a screw. |
| Root | The inner groove of the screw runs around the threaded surface. |
| Crest | The highest point of the screw that’s the furthest away from the center. |
| Head | The head refers to the topmost exposed area of the screw which is used to rotate the screw. |
| Form | The form is the overall shape of the thread ridge. The triangular or hexagonal profiles are some of the most common ones. |
| Taper | Some threads don’t remain in a straight line with adjacent crests parallel to one another. They instead have a tapered thread which helps in providing a tighter grip and seal. |
| Coarse & Fine Thread | This refers to how far the threads are. The finer the threads are, the greater the number of threads per unit distance. Similarly, coarse threads are the opposite of that and have a lower number of threads per distance. |
| Metric threads | Metric threads have a distance mapped in SI units. |
| Inch threads | The distance in these threads is in American units, which are in inches. |
Incorporating threaded design in any 3D printing design requires careful precision. However, as stated before, the process is more flexible and intuitive when compared with other traditional methods that the industry uses.
The first question about threaded parts is about the software to use. Is there a special software package for threaded parts? The answer is no. Designers can incorporate threads or any other features in a 3D printing part with the same software package. For example, someone using Fusion 360 or SolidWorks won’t have to shift to any other program.
Moreover, the basics are more important. Anyone aware of the basic terminologies, their effect, and the overall requirement of the project would easily add the threads in the design file using very simple and easy-to-use functions. Irrespective of the software program, the basic function to create threaded parts remains the same. However, the steps differ slightly depending on whether the external or internal thread is needed.
The process for 3d printing threads is quite straightforward. However, it isn’t always easy because of several considerations involved. The biggest limiting factor is the size as it’s considerably harder to add threads with a smaller diameter.
Moreover, the smallest size possible for a setup is dependent on the characteristics of the 3D printer. For larger diameters, any 3D printer can work because the thread has enough time to cool down while the nozzle is elsewhere. Similarly, for smaller diameters, it’s always better to test the 3D printer beforehand to avoid any issues down the line.
Apart from the printer characteristics, the calibration and settings are also important for reliable results. Here are a few general guidelines to ensure reliability and consistency in 3D printer performance when it comes to threads.
There are multiple ways of incorporating threads into a 3D-printed part. The best choice depends on the application and the requirements of the project. However, the following ways are the most common in the industry.
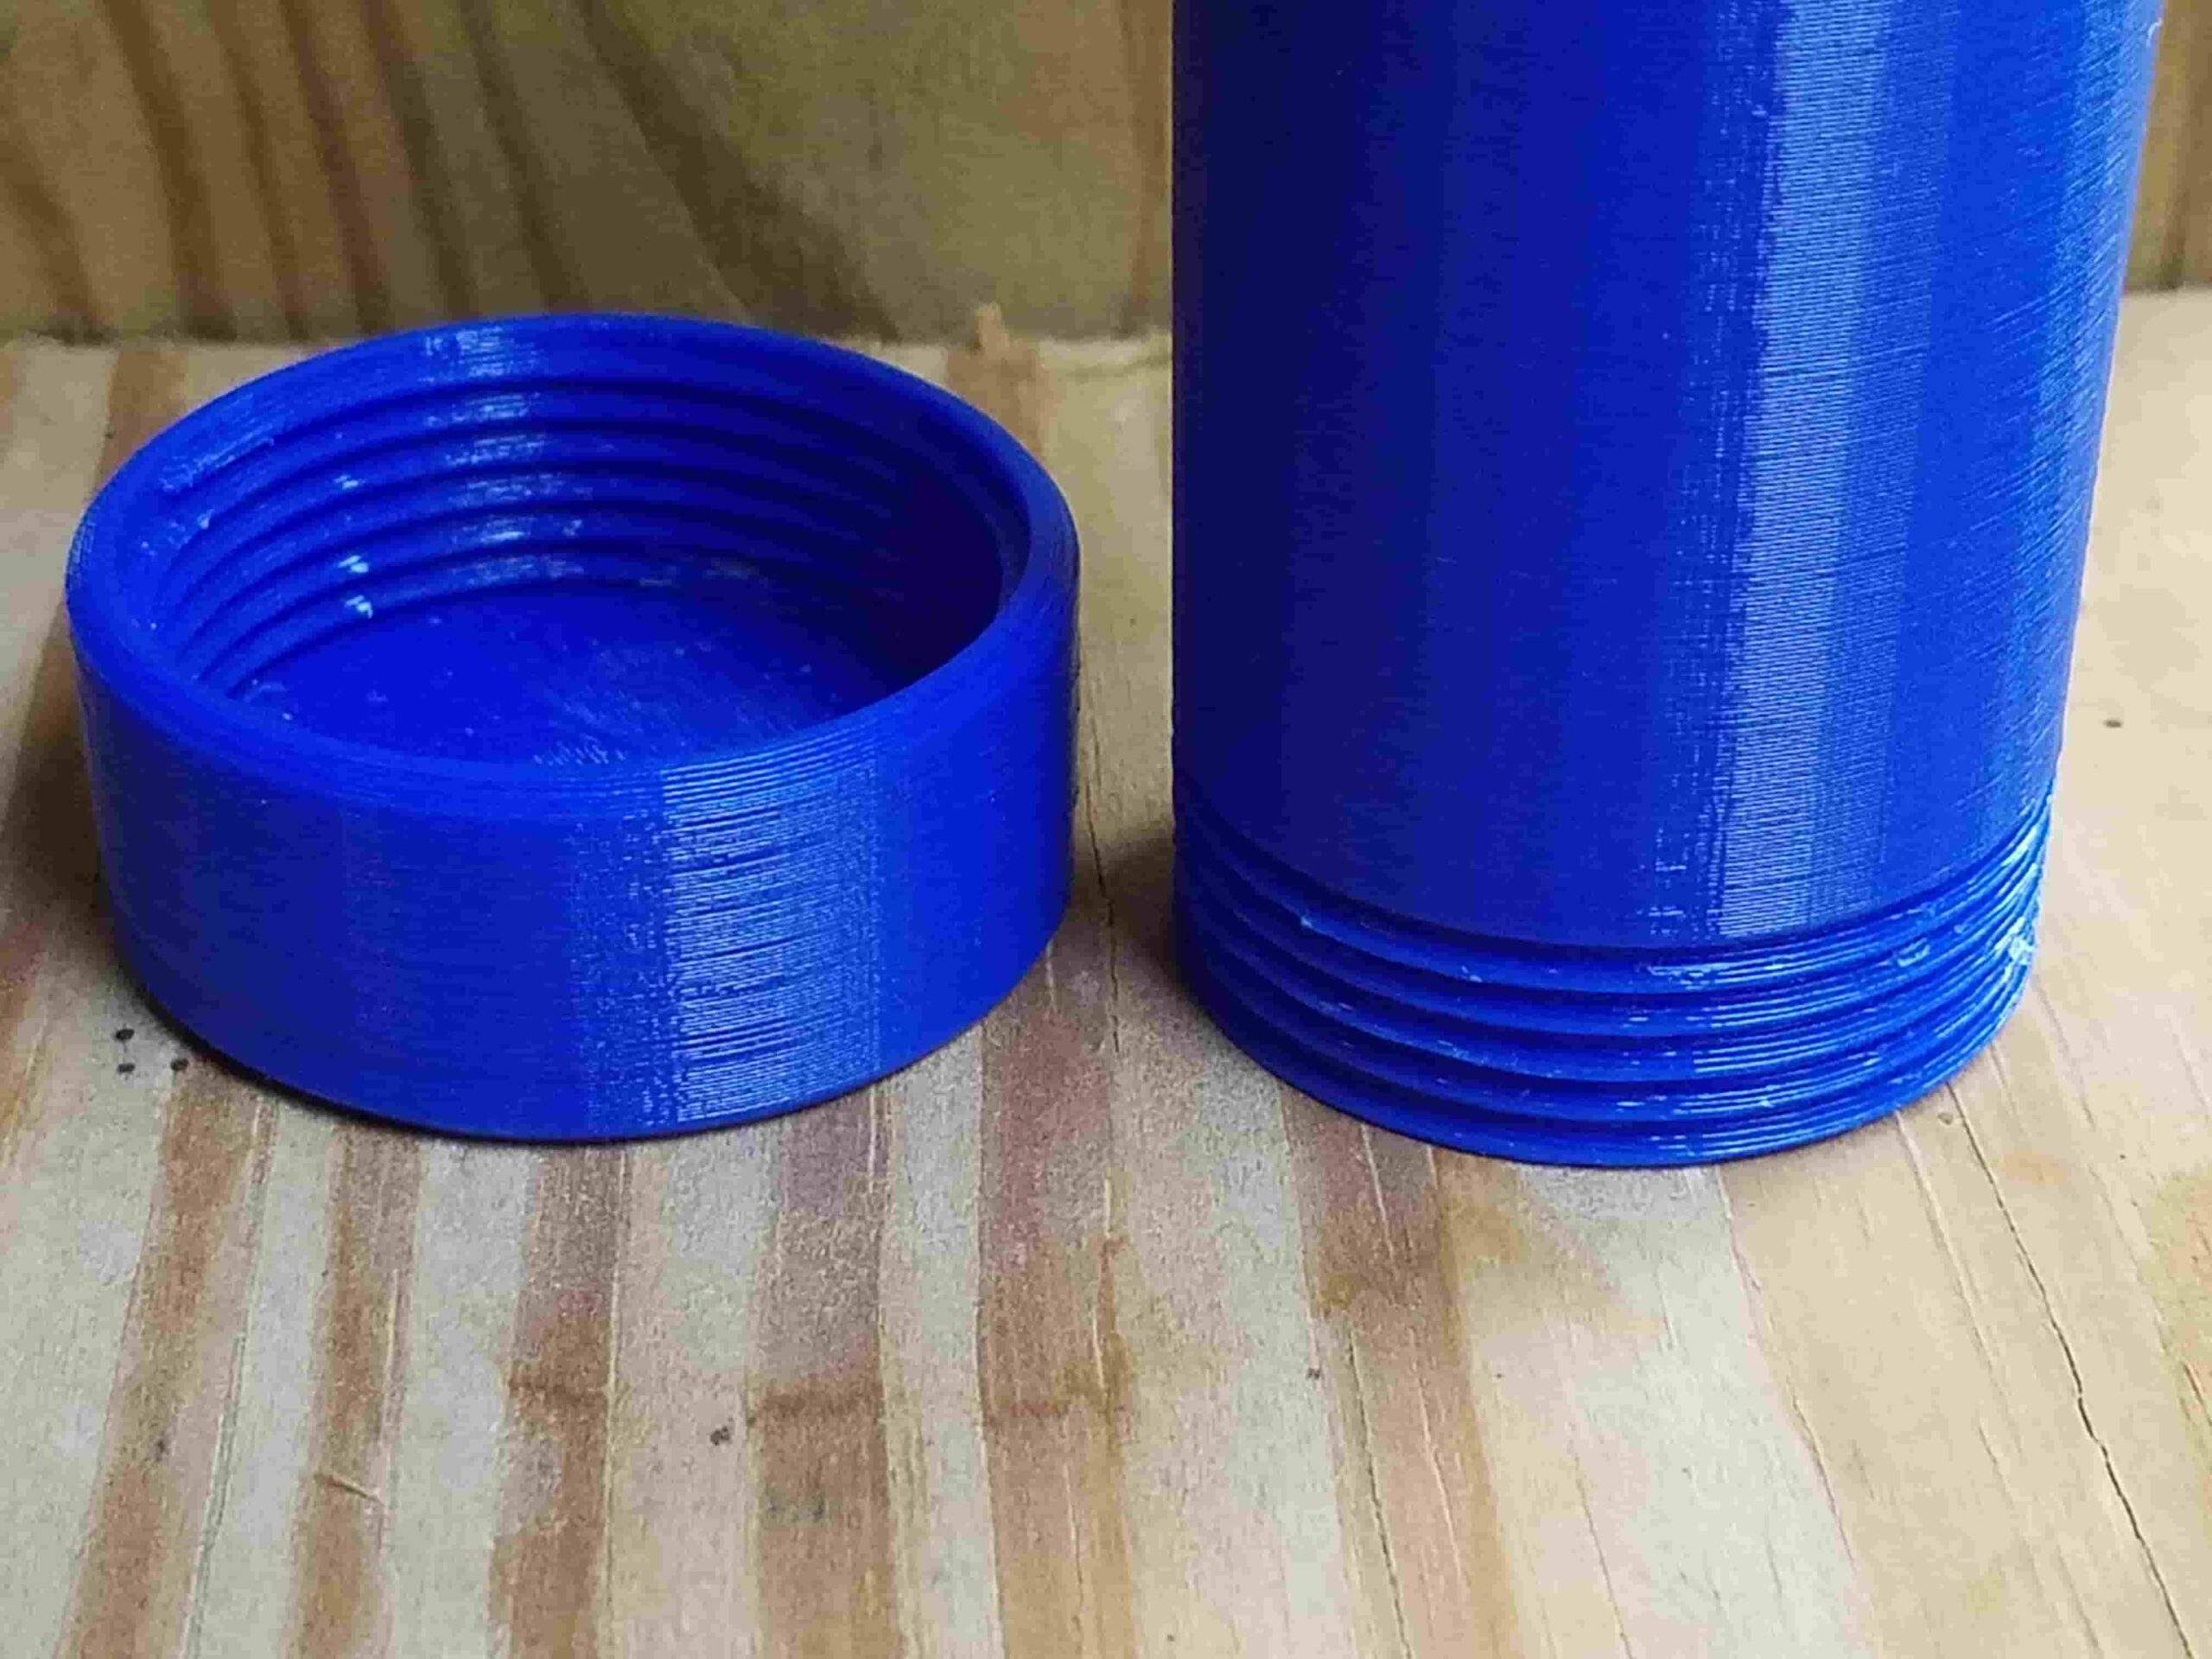
Printing threads directly is among the most effective ways to incorporate threads in a design. It’s an ideal way because it allows custom design and delivers maximum flexibility to the users.
There are, however, a few limitations as well. Directly printing smaller diameters is quite difficult. Similarly, the threads don’t hold up for longer cycles of assembling and disassembling as the threads won’t be strong enough to add or remove a screw.
Furthermore, direct printing is not a viable solution for situations where a certain number of copies are needed. In such cases, manufacturers either need to have additional printers. However, that results in elevated costs.
This is an excellent option as 3D printing is most common with thermoplastic and thermoset materials.
For thermoplastic parts, using heat set inserts is a viable option as it uses the combination of heat and pressure to permanently add the threads to an existing part. The process is extremely simple but time-consuming as it requires processing from a soldering iron and waiting for the part to cool down.
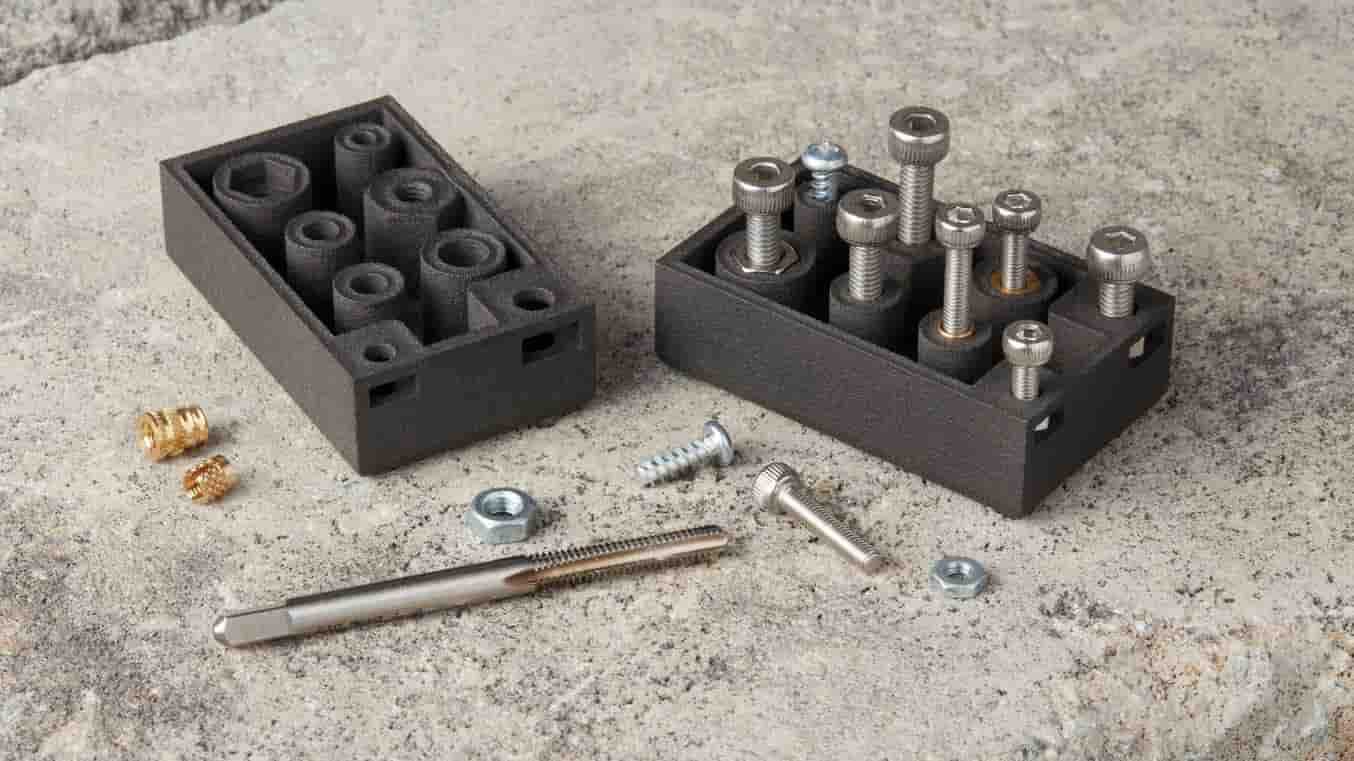
For thermoset parts, the process involves holding the insert with glue as well. Similar to the thermoset materials, this process also has a significant lead time as the glue requires time to cure before the installation of the screw.
This is one of the quickest and most economical ways of adding threads to a 3D-printed design. The threads will provide an excellent hold, and the equipment needed to process them is simple and readily available in almost all workshops. The threads, however, won’t be too strong and they may also increase the overall lead time as the process itself is manual.
Finally, perhaps the most effective approach is to use a combination of methods. Add 3d printed threads in areas with limited accessibility and using the combination of aforementioned methods can deliver the best results. However, the lead time will be high as well because most of these methods require significant processing times.
Whether it’s 3Dprinting threads in a product or testing out a new design assembly for a specific application. Having the right manufacturing partner can make all the difference in performance. Therefore, RapidDirect takes pride in its long and successful history of providing the most comprehensive manufacturing services in the market. Our experienced 3D printing team has all the latest technology and the expertise of working with an extensive list of global clients to guarantee consistency and performance at the most competitive price.
One thing that sets RapidDirect apart is the intuitive online manufacturing platform. It has everything, anyone, thinking of starting a new project needs to gauge the existing prices and decide on the cost. To get started, simply upload your design files and configure your materials, finishing, quantities and more, and then get instant quotations, or request quotes with our sales engineers.