ABS is a popular and cost-effective 3D printing filament, favored for many 3D printing projects. However, most 3D printers have a drawback: their printed parts lack the smooth finish of injection-molded counterparts. They exhibit a matte, rough surface with visible layer lines, regardless of the chosen layer height.
To achieve a smoother surface, post-processing is necessary. ABS acetone smoothing is one of the most popular 3D printing surface finishing solutions. While other thermoplastics can be dissolved using different solvents, none match the effectiveness of acetone on ABS. However, it’s crucial to exercise caution when smoothing 3D printed ABS plastic parts.
This article provides a stepwise guide to performing ABS smoothing, Detailing the various safety measures. You will also learn tips for achieving the best possible finish as well as alternative post-processing techniques.
What Is ABS Acetone Smoothing?
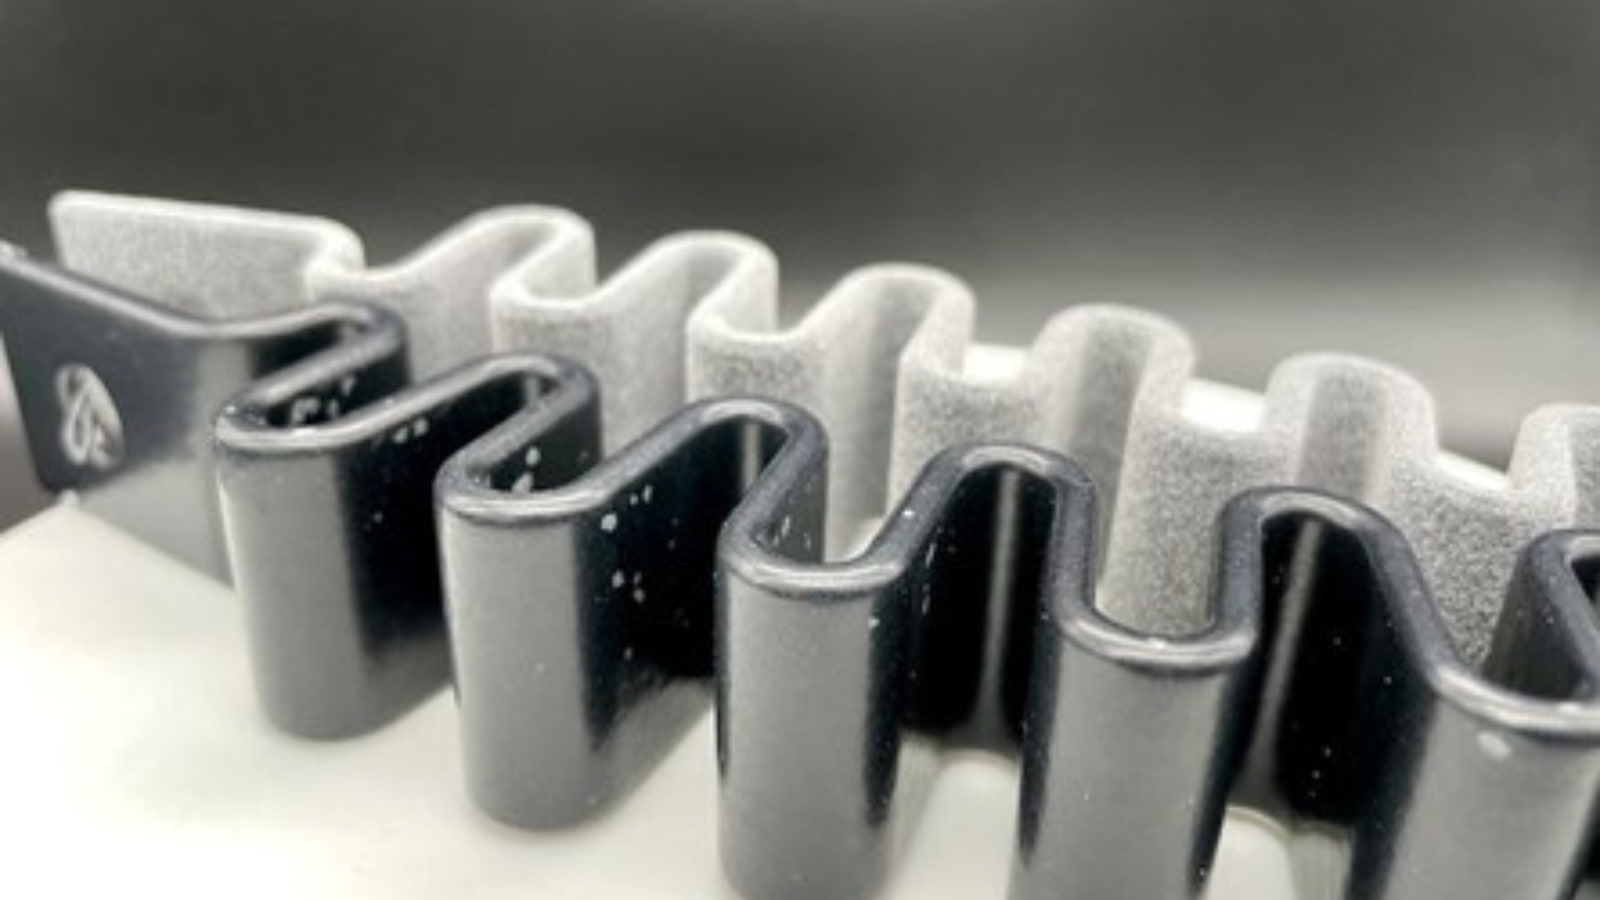
ABS acetone smoothing is a technique used for post-processing ABS 3D printed filament. It effectively eliminates layer lines by melting them with acetone. The process involves exposing untreated 3D printed ABS plastic parts to acetone vapors, causing the individual print layers to fuse together. This results in a glossy surface finish with no visible lines.
What Is Acetone?
Acetone is a transparent organic liquid renowned for its versatility as a chemical solvent, capable of dissolving both polar and nonpolar substances. What sets acetone apart is its unique ability to dissolve both polar and nonpolar substances, a feature lacking in many other solvents. This versatility arises from acetone’s chemical composition, which combines polar and nonpolar elements. Consequently, acetone finds applications with both organic and inorganic materials.
Furthermore, acetone is miscible with water, meaning it can seamlessly mix with water in any proportion. This property makes it valuable for aiding in the dissolution of various chemicals in diverse settings. Despite its organic nature, acetone remains non-toxic, adding to its broad utility in numerous fields.
How Acetone Interacts with ABS Plastic
Acrylonitrile butadiene styrene (ABS) is a thermoplastic polymer created by polymerizing styrene and acrylonitrile alongside polybutadiene. As with all polymers, ABS exhibits resistance to certain substances while being susceptible to others.
Regarding its chemical composition and smoothing, ABS has a notable trait of being soluble in various compounds. These compounds include esters, chloroform, ethylene dichloride, and certain ketones, including acetone. Notably, chloroform and ethylene dichloride are hazardous and require rigorous safety precautions. On the other hand, acetone is a milder and more manageable option for non-controlled environments.
From a chemical standpoint, acetone dissolves ABS because the thermoplastic is soluble in ketones. This results in the ABS (the solute) dissolving into the acetone (the solvent), creating a mixture or solution (slurry) on the plastic’s surface. Practically, applying a small quantity of acetone to a 3D-printed ABS part leads to the surface dissolving.
Why Should You Acetone Smooth Your ABS Prints?
When done systematically, ABS acetone smoothing can selectively remove enough ABS to eliminate imperfections like layer lines, yielding a smoother component. Some researchers have even proposed that acetone smoothing can enhance the strength of ABS parts by promoting better interlayer adhesion. Here is why you should acetone smooth your ABS 3D prints.
Achieving a Glossy Finish
Smoothing ABS parts is a method to eliminate visible lines and transform the surface texture from matte to glossy. Using acetone, the ABS part undergoes a near-dissolution process, causing the layers to bond and resulting in a shiny surface appearance. The outcome is a 3D print that is smooth, shiny, and professionally finished.
Glossy surfaces are particularly appealing for certain types of prints, such as models, figures, busts, and decorative pieces. Additionally, when the filament matches the desired color, there’s no need for additional painting. The enhanced appearance of glossy parts also adds versatility, making 3D-printed ABS components suitable for various applications.
Removing Layer Lines and Imperfections
Some 3D printing processes often result in visible layer lines on parts due to the movement from one layer to another along the Z-axis. These layer lines are especially noticeable with larger layer heights and curved designs. Acetone plays a key role in the smoothing process.
When applied to the 3D-printed ABS part, acetone smoothens the surface and merges the gaps between layers. This results in a part with no discernible lines resembling an injection-molded product. Additionally, the absence of open gaps reduces leakage. This makes it suitable for printing items like vases, containers, part boxes, etc.
Strengthening the ABS Part
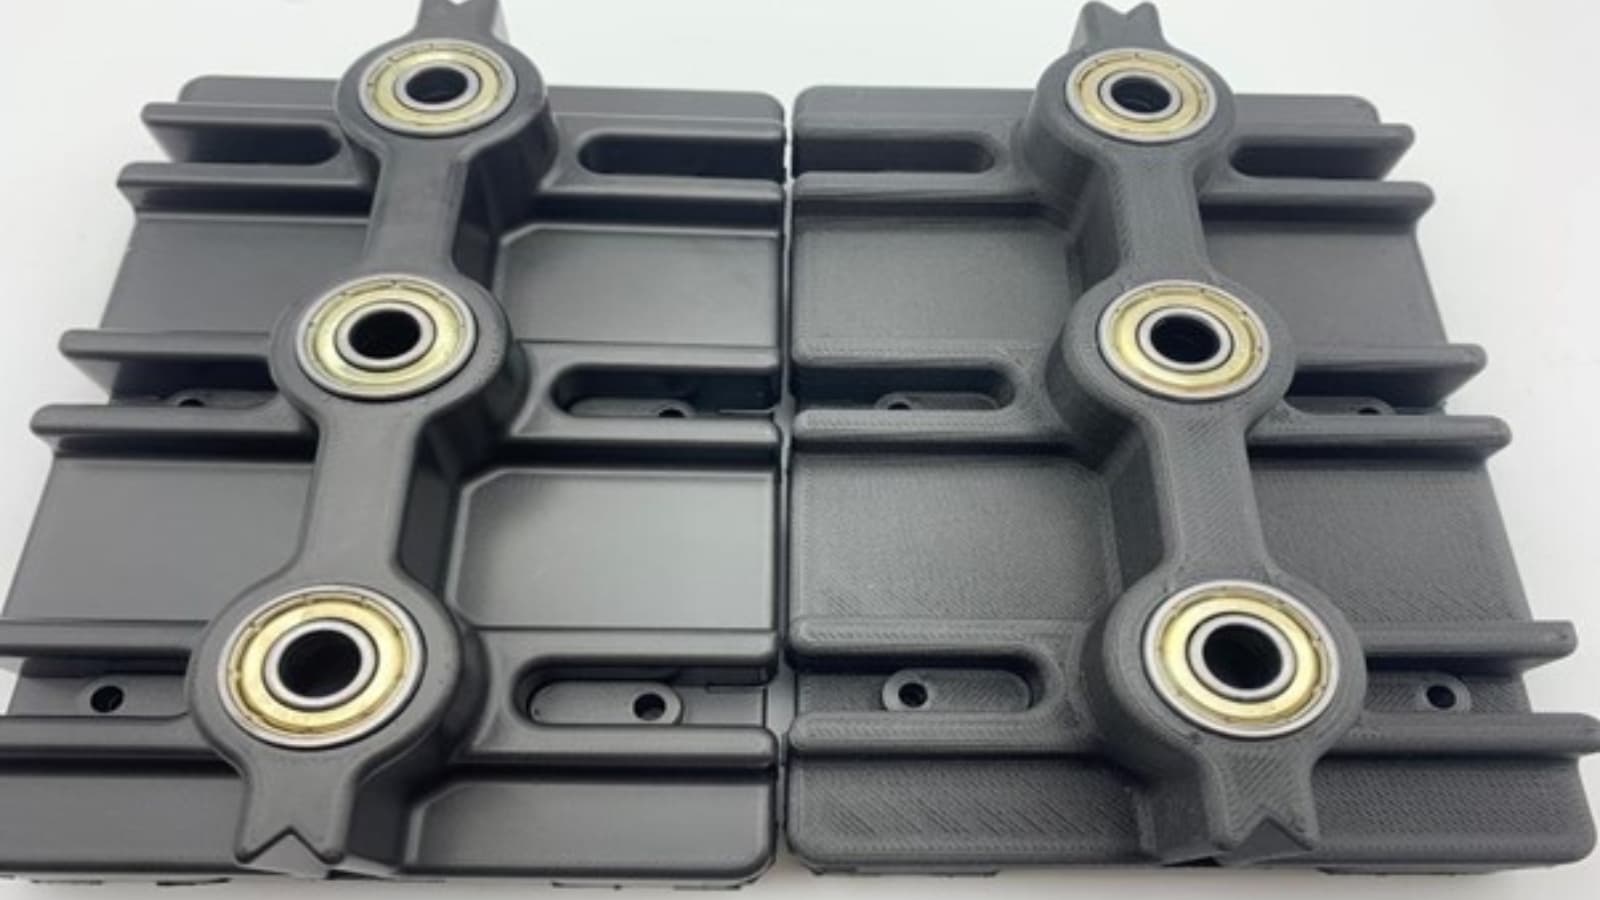
As mentioned, acetone smoothing makes strong ABS 3D prints by eliminating layer lines and microscopic gaps. This reduces stress points and potential weak spots caused by layer adhesion issues. Before ABS vapor smoothing, FDM prints exhibit anisotropic mechanical properties, meaning their strength varies with the loading direction. This issue is prevalent in FDM 3D printing.
Acetone vapor smoothing helps mitigate this by enhancing bonds in the z-axis (perpendicular to the print bed). This effect can be advantageous for parts subjected to z-axis loads. However, it’s essential to note that acetone exposure temporarily softens the surface layers of the print and may take several weeks to fully reharden.
Materials and Equipment Needed
If you’re determined to proceed with acetone smoothing, you can use common household items. Here’s what you’ll require:
Types of Acetone
When using acetone for ABS smoothing, it is crucial to select high-purity acetone. Ideally, you should use acetone with a purity of 99% or higher. This purity level ensures that the acetone is free from impurities, water, and other contaminants that could negatively affect the smoothing process or the quality of your ABS plastic prints. Any impurities or moisture in the solvent can lead to inconsistent results or damage your 3D prints.
Safety Equipment
Ensuring safety during ABS smoothing is paramount, as the process involves working with potentially hazardous chemicals. To protect yourself, it’s essential to use the appropriate safety equipment. Here’s a list of safety gear you should consider when performing ABS acetone smoothing:
- Safety Glasses or Goggles: Protect your eyes from accidental splashes or fumes by wearing safety glasses or goggles with side shields.
- Respirator or Mask: To prevent inhaling acetone fumes, especially in poorly ventilated areas, wear a respirator or mask with organic vapor cartridges. Ensure it provides adequate protection against chemical fumes.
- Chemical-Resistant Gloves: Use gloves made of materials like nitrile or neoprene to shield your hands from direct contact with acetone. These gloves are resistant to chemical exposure.
- Long-Sleeved Clothing: Wear long-sleeved clothing to minimize skin exposure. This can help prevent accidental contact with acetone.
- Ventilation: Perform ABS smoothing in a well-ventilated area or use a fume hood if available. Good airflow helps disperse acetone fumes and reduces the risk of inhaling harmful vapors.
- Fire Extinguisher: Have a fire extinguisher nearby, as acetone is flammable. You’ll be prepared to react quickly and safely in case of a fire.
- Safety Shower and Eye Wash Station: If available, be aware of the location of emergency safety equipment like safety showers and eye wash stations in case of accidental exposure to acetone.
Brushes, Containers, and other tools
The essential tools you need during the process include the following:
- Transparent container: Choose a container that accommodates your 3D-printed part’s size. Transparent materials are preferable for monitoring the smoothing process. A tightly sealed lid is ideal; otherwise, use a solid base or plate to create a sufficient seal for the acetone vapor to stay contained.
- Brush: A brush is needed to apply acetone evenly to the surface of your ABS print. It helps spread the solvent and ensure consistent smoothing.
- Aluminum foil: Using aluminum foil for the base of the container isolates the ABS part from the bottom, as acetone does not dissolve metals.
- Paper towels: You will need to soak these materials in acetone to facilitate vaporization. Any absorbent paper towels or tissues will suffice.
Four-Step Guide of ABS Acetone Smoothing
In this section, we will break down the process of acetone smoothing into four simple yet comprehensive steps.
Step 1: Preparing the ABS Part
Begin the process with a clean and dry ABS printed part. Use dedicated plastic cleanup files (flat or half-round) to file the surface. It ensures a smoother surface by removing aggressive points and layers that acetone can’t address. Avoid using files that have been used for other materials, as foreign particles can mar the finish. The filing process need not be excessively time-consuming, and you don’t have to cover the entire piece. Neglecting this step may result in uneven areas on your print.
Step 2: Applying Acetone
Now, let’s begin the acetone smoothing process. We’ll discuss the two most effective methods for smoothing ABS with acetone in a controlled manner.
Method 1: Brushing
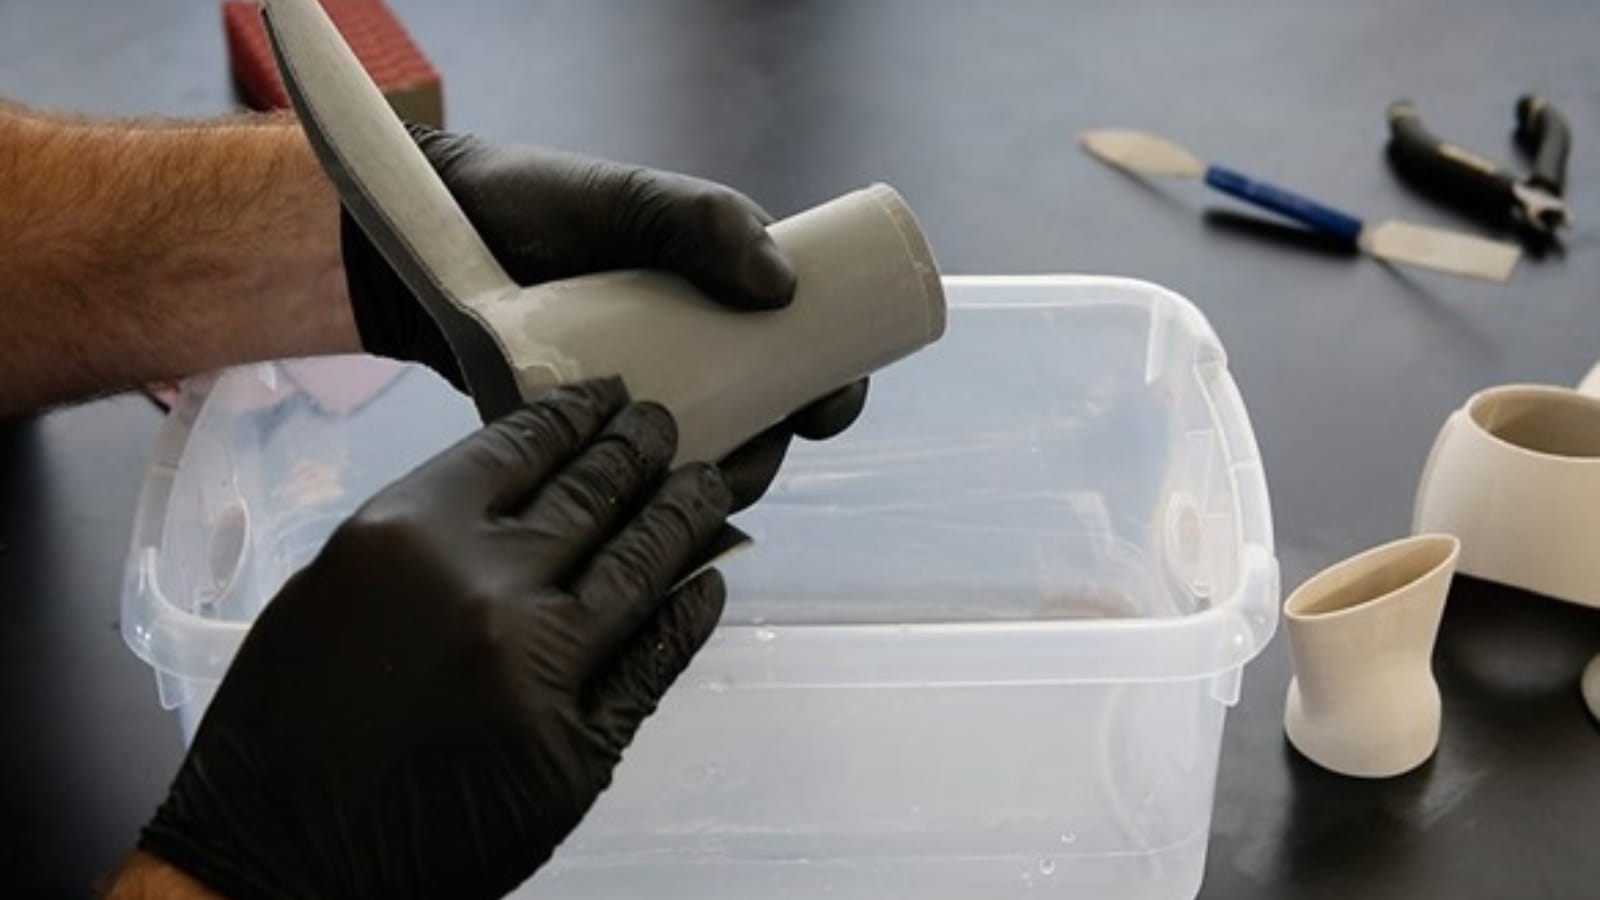
The simplest method for achieving a fairly smooth finish on ABS parts involves using a brush to apply liquid acetone. With this method, you have control over the degree of smoothing and application. The size of the paintbrush depends on the area you want to smooth. Opt for a fine-tipped brush for small features and a flat brush for larger, flat areas.
- Begin by placing a small quantity of liquid acetone in a shallow container.
- Dip the brush’s end in the acetone solution and spread it thinly over the surface of the 3D-printed part.
- Continue applying acetone until you are satisfied with the level of smoothness and appearance.
- After applying acetone, allow the parts to dry before use.
Using a brush and acetone is an effective method for smoothing models and prints with intricate details. It allows for precision and minimizes the risk of damaging these details. This approach also requires less time than other smoothing methods.
However, this method consumes a significant amount of acetone and may result in uneven smoothing, leaving streaks or uneven surfaces. There’s also a risk of applying too much solvent, which could cause permanent deformation or dissolve the thin walls of the part.
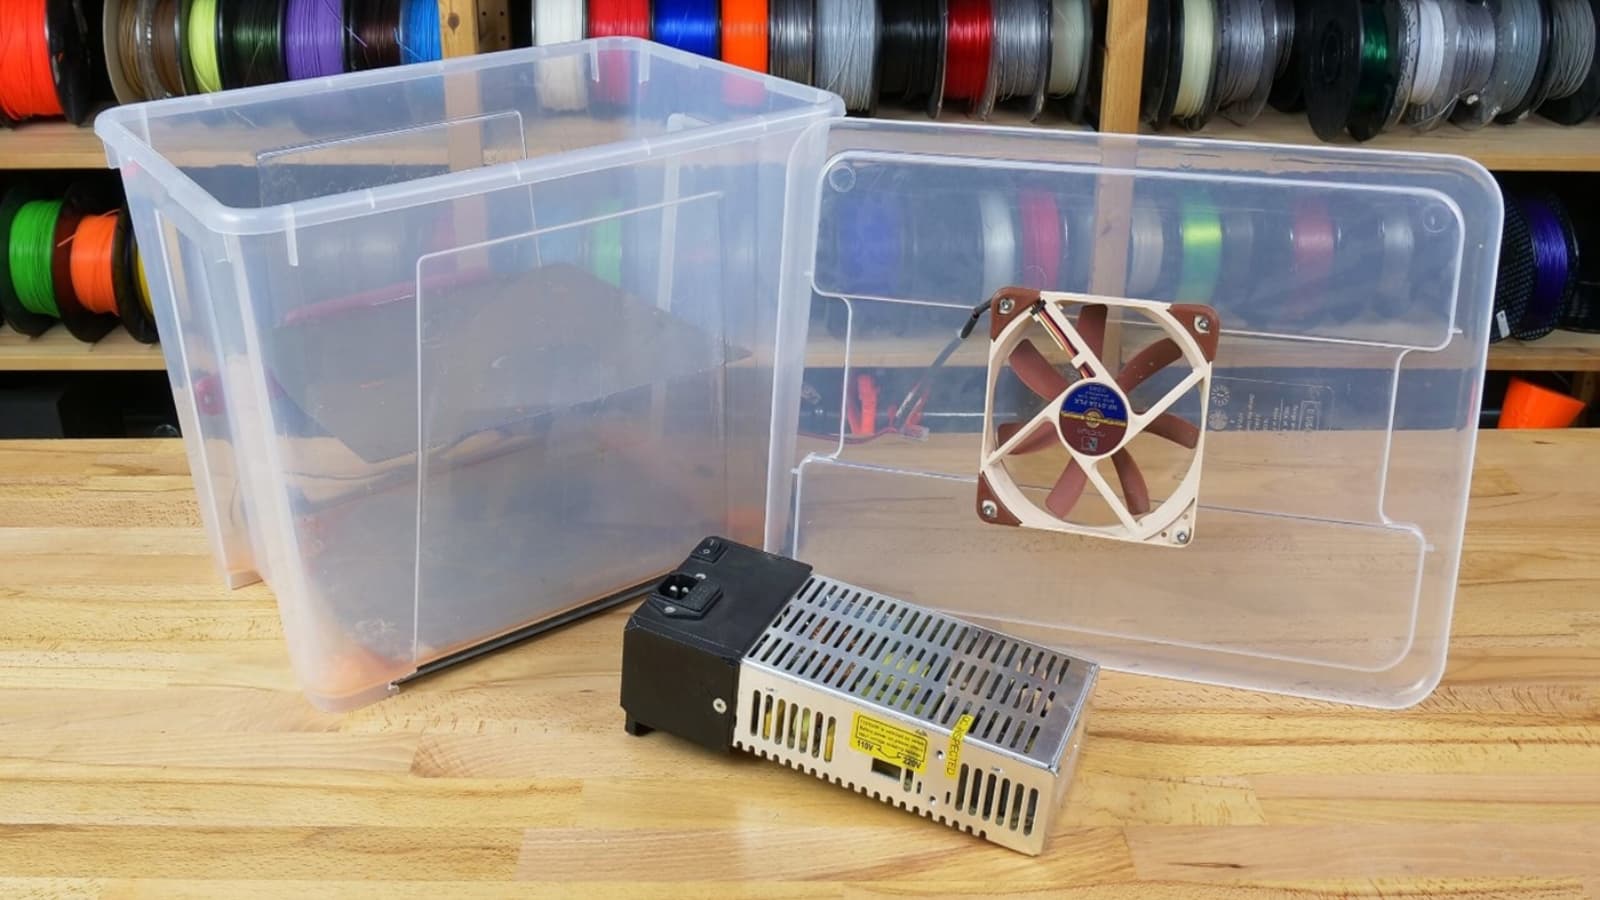
Method 2: Acetone Vapor Bath
A highly effective way to smooth ABS is by creating an acetone vapor bath. It doesn’t require directly applying liquid acetone to the part. Instead, it allows acetone fumes to permeate the part’s surface.
Here is a step-by-step guide on how to vapor smooth ABS:
- Make a Smoothing Box
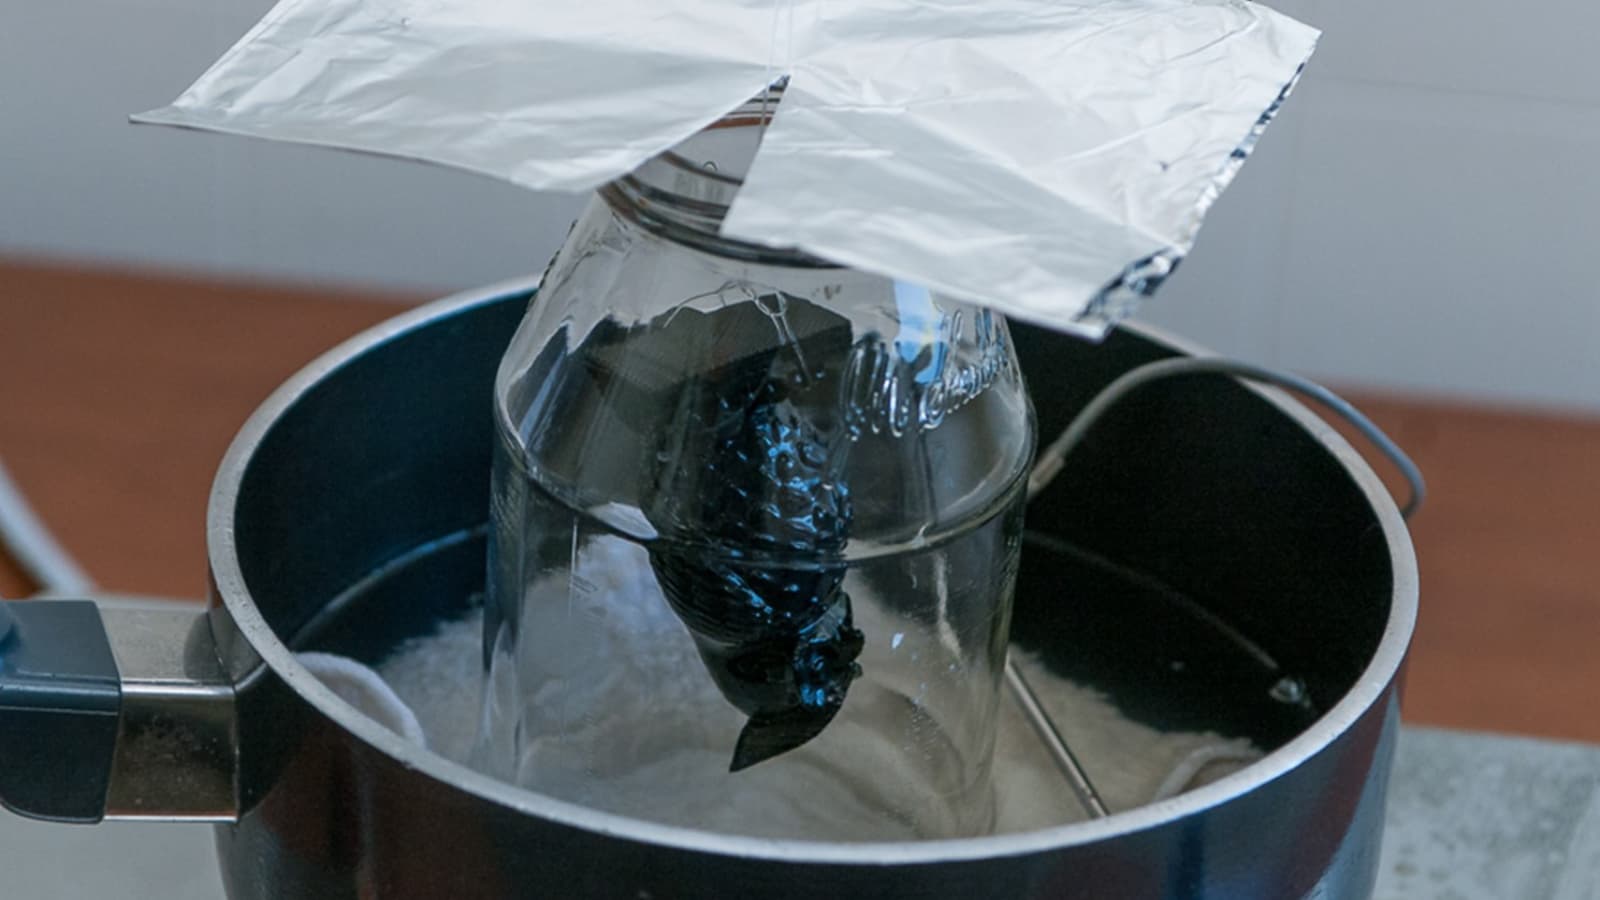
To apply the ABS vapor smoothing method, you’ll need a partially enclosed container to contain the acetone fumes around the printed part without sealing it airtight. For small ABS parts, consider a glass container like a jar. When dealing with larger parts or smoothing multiple items simultaneously, opt for a transparent polypropylene (PP) container.
- Put a Raised Platform inside the Box
You’ll require a raised platform to prevent your ABS parts from contacting the bottom of the smoothing box. Ensure that this platform is composed of a material not soluble in acetone to avoid dissolution. Metal, such as a regular plate covered with aluminum foil, is suitable for this purpose.
- Use Paper Towels
Soak tissue or paper towels in the solvent. Then, place these acetone-soaked tissues along the edges of the smoothing box. You can secure them by pressing firmly against the container walls or using magnets, positioning one inside and one outside the box.
- Close the Smoothing Box
Effective vapor smoothing requires you to seal the smoothing box to contain the acetone fumes. For containers like jars or those with snap-on lids, place the lid lightly on top without completely sealing it. Then, create a few small holes in the lid. It’s crucial not to fully seal the box to prevent the dangerous pressure buildup.
- Let the Acetone Vapor Smoothing Take Place
The ABS vapor smoothing process typically lasts anywhere from 10 minutes to an hour. It is advisable to monitor it through the transparent smoothing box. Once you achieve the desired level of smoothness, remove the box’s lid and dispose of the acetone-soaked paper safely.
Step 3: Monitoring and Controlling the Process
Monitoring and controlling the acetone smoothing process, especially the vapor bath process, is essential. Set a timer and allow time for the smoothing box to fill with acetone fumes, affecting the model. The duration varies based on your model’s size, available space, and the acetone in the tissues. It can range from 10 minutes to 2 hours. As you smooth more pieces, you’ll gain a better sense of the required duration.
To avoid over-smoothing, check the part’s progress every few minutes, which is easier with a transparent box. For enhanced efficacy, consider adding heat (not excessive) or a small fan inside the smoothing box. However, exercise caution with electronics to prevent potential fire hazards.
Step 4: Finishing Touches
Once you’re satisfied with the smoothing process, follow these steps to conclude the process (vapor bath):
- Ensure you’re in a well-ventilated area before carefully removing the container, preventing contact between the paper towels and the 3D-printed part.
- Avoid touching the part once removed from the container, as it remains in a semi-liquid state and can be easily distorted or marred by fingerprints.
- Place the part in an isolated location and allow it to dry, enabling excess acetone to evaporate. Drying may take a few hours to a few days for the part to regain rigidity.
After hardening, inspect the piece for a consistent glossy finish. If you’re satisfied with the outcome, you can remove the part from the wire hanger. If you intend to paint the piece, you can choose to leave the hanger in place. It will be helpful for holding and suspending during the painting process.
Regarding finishing options:
- If the part meets your expectations, you can leave it as is or sand it for a finer matte finish.
- If there are surface irregularities, you can file or sand them and repeat the smoothing process.
- If you plan to paint the piece, you can proceed with priming and painting.
Regarding any holes created by the hanger:
- These holes should be minimal in appearance and easy to clean up, ideally placed in less noticeable areas.
- If you intend to paint the piece, you can fill the hole with spot filler, sand it, and then proceed with painting.
Safety Precautions During ABS Acetone Smoothing
Using acetone for smoothing your 3D printed ABS plastic parts can be effective. Nonetheless, it is crucial to acknowledge that pure acetone is hazardous. Therefore, you must take some precautions to ensure your safety.
First, acetone is highly flammable and volatile and can ignite at room temperature. Avoid using it near fire or spark sources, and store it in cool, well-ventilated places away from direct sunlight and heat. Furthermore, prolonged exposure to acetone can lead to headaches, dizziness, nausea, confusion, and skin irritation.
Setting Up Your Workspace: Safety First!
The way you set up your workplace is very important for your safety. You must put every safety measure in place to prevent unwanted hazards. They include the following:
- Use a Well-ventilated Area: While providing your ABS print with an acetone vapor bath, you’ll likely encounter a substantial amount of acetone vapor in the vicinity. Therefore, when handling acetone, ensure you do so in a well-ventilated area.
- Wear Protective Equipment: Ensure you wear protective gloves and goggles before opening the acetone bottle and pouring it onto the paper towels. While acetone isn’t highly toxic, taking these precautions is a sensible way to protect yourself.
- Use a Good ABS Print: Invest in a high-quality ABS filament. Inexpensive filaments may include additives from different plastics that might not respond well to acetone. To safeguard your efforts and ensure excellent results, opt for ABS filaments only from reputable brands.
- Ensure Proper Storage and Disposal of Acetone: When storing acetone, ensure it has a tightly sealed lid and keep it away from electrical outlets, stoves, or heat sources due to its flammability. When disposing of acetone, use a metal container lined with a plastic garbage bag, then dispose of it with regular trash. For liquid acetone disposal, take it to a hazardous waste treatment, storage, disposal, or recycling facility drop-off site.
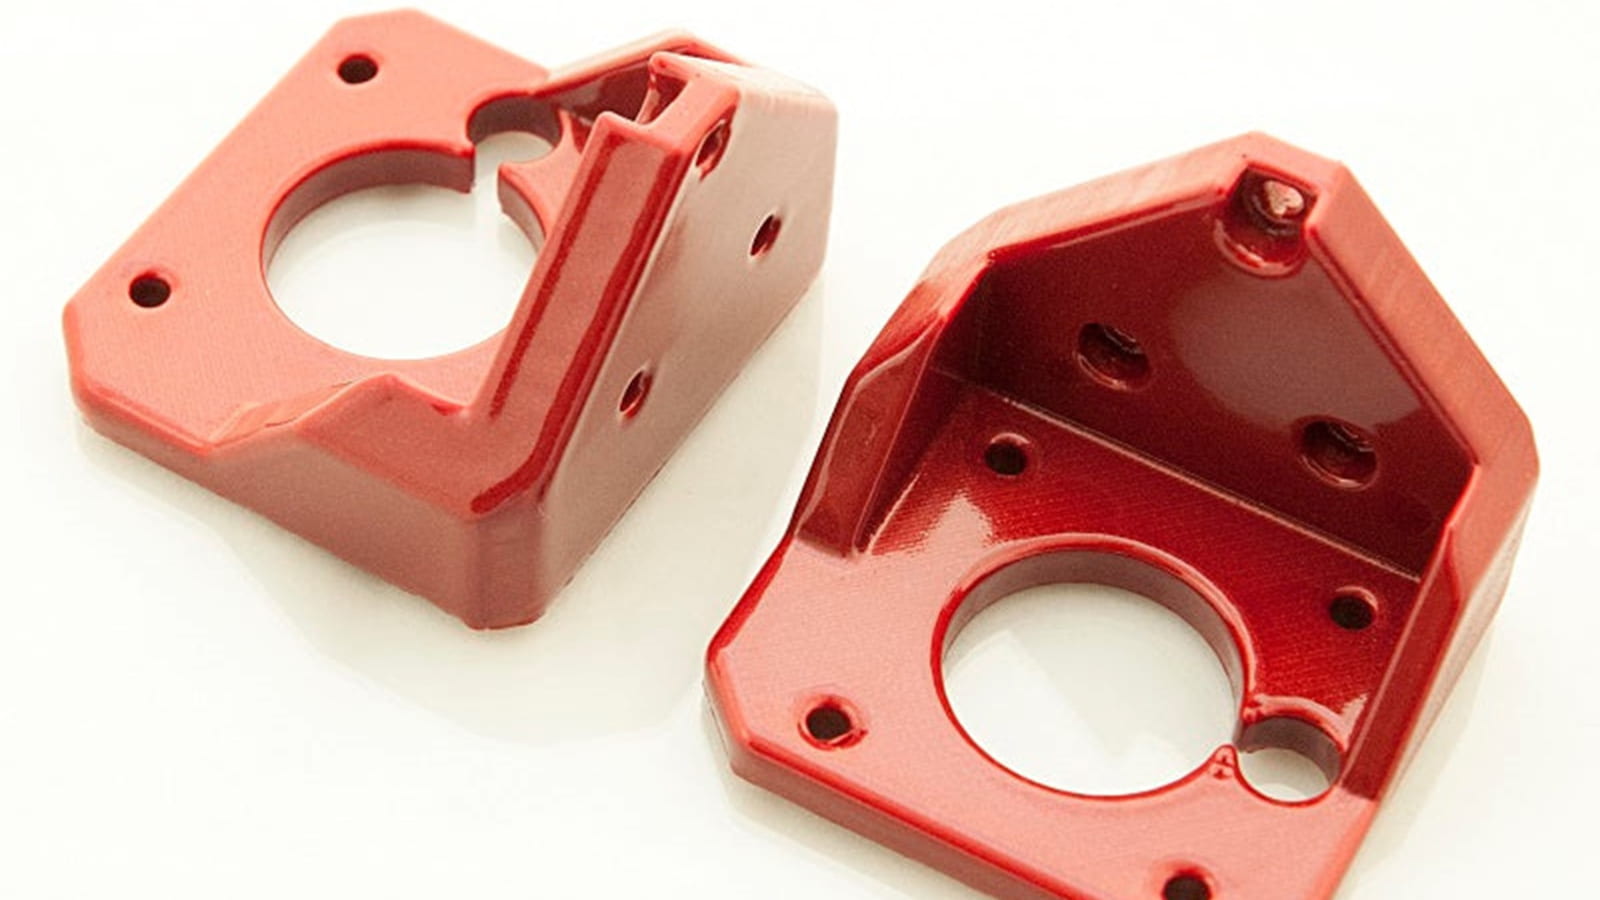
RapidDirect Vapor Polishing Services for ABS Prints
The ultimate goal of any prototyping or low-volume production process is to meet quality standards. Vapor polishing is a critical post-production step to ensure that your 3D-printed ABS products meet these standards. At RapidDirect, we understand this importance and are committed to turning your prototyping ideas into reality.
We combine skilled technicians and advanced manufacturing techniques to offer top-notch vapor polishing services. We collaborate with you to make informed decisions about your finishing project. The best part is that all our services are competitively priced. Upload your design file today to get an instant quote.
Tips and Best Practices for ABS Acetone Smoothing
The following tips will help you get the best results from your ABS smoothing project:
Achieving Consistent Results
Following some key steps can help you achieve the desired smooth and polished finish. First, it is essential to monitor the smoothing process carefully. Exposure to acetone for too long can lead to over-smoothing and loss of fine details. Be patient and regularly check your print’s progress until you achieve the desired finish.
Furthermore, ensure an even distribution of the acetone across the surface of your ABS print. Experiment with different application methods and acetone concentrations to find the right balance for your specific project. Allow your 3D parts to dry thoroughly in a well-ventilated area to dissipate any remaining acetone fumes and ensure a polished finish.
Adjusting the Process for Different Part Sizes and Geometries
While the basic principles of acetone smoothing remain consistent, adapting your approach can significantly affect the outcome. It is advisable to use a much smaller amount of acetone and shorter exposure times for smaller parts with intricate details. Since these parts have less surface area, they can smooth out quickly. In contrast, larger parts may require more acetone and longer exposure times. This will help ensure uniform smoothing across their surfaces.
Moreover, the orientation of your 3D printed part also plays a role in the smoothing process. Vertical surfaces tend to smooth more quickly than horizontal ones. So, take this into account when determining exposure times. Experimentation and test prints can help you find the ideal settings for different part sizes and geometries.
Alternatives to ABS Acetone Smoothing
While acetone smoothing is highly effective, you may prefer a process that does not involve chemical use. In that case, consider the following methods:
Sanding
Sanding is the most commonly used method for smoothing 3D printed parts, which doesn’t involve chemicals. Sandpaper is manually applied to the part, and its abrasive surface gradually removes material from the part’s surface.
When sanding ABS parts, start with coarse sandpaper (e.g., 80-grit) and progress to finer grits (such as 120 and 240). Use very fine-grit sandpaper (e.g., 1000) with water for a smoother finish. Ensure even coverage across the entire part surface. If time allows, manual sanding is recommended. While sanding is a safe and straightforward process, accessing deep crevices on the part and applying consistent pressure across the entire surface can be challenging.
Polishing
Suppose you prefer to avoid using a potent solvent like acetone. In that case, you can achieve a glossy finish on your ABS parts by using a liquid polish and a cloth. This step should be carried out after sanding when the part’s surface is reasonably smooth. Apply the polish-soaked cloth with firm circular motions until the part attains a high gloss.
How to Vapor Polish ABS Prints Without Losing Dimensional Accuracy or Fine Detail
Check this video:
FAQs: Addressing Common Concerns
No, vapor smoothing PLA and PTEG may be impossible, especially with solvents like acetone. PLA and PETG exhibit good chemical resistance and are not soluble in ketones. Consequently, solvents such as acetone and alcohol have minimal impact on them. While PLA smoothing has garnered attention in the 3D printing community, attempts to find chemical alternatives have proven to be too hazardous for practical use. As a result, the most dependable method for smoothing PLA and PETG is through manual sanding.
The duration of ABS smoothing varies based on factors like print size, geometry, acetone concentration, and desired smoothness. Smaller, less intricate prints can smooth in about 10 to 20 minutes, while larger or complex prints may take several hours. Monitoring the process helps avoid over-smoothing. Starting with shorter exposure times and adjusting as needed ensures the desired finish.
Yes, you can over-smooth if you expose the 3D part to acetone for too long. This can potentially cause permanent deformation or dissolve the thin walls of the part. To prevent it, you must monitor the smoothing process carefully. Check the part’s progress every few minutes, which is easier with a transparent container. Set a timer and allow the smoothing box to fill with acetone fumes. The duration varies based on your model’s size, available space, and the acetone in the tissues.
Acetone may negatively affect the horizontal strength of an ABS part. Therefore, if you require enhanced horizontal strength, it’s advisable to avoid acetone smoothing. However, acetone does notably improve the vertical strength of a treated part while enhancing its visual appearance.
To achieve a smooth finish on ABS parts, you must carefully carry out and monitor the process. One common method involves using a brush to apply liquid acetone to the 3D-printed part. Start by placing small amounts of acetone in a shallow container. After this, dip the brush in it before applying a thin coat to the part’s surface.
Experiment with various application techniques and acetone concentrations to find the optimal balance for your specific project. Remember that smaller, more intricate prints may require less acetone and shorter smoothing times than larger, bulkier ones. After the smoothing process, allow your print to thoroughly dry in a well-ventilated area to disperse any remaining acetone fumes and achieve an evenly polished finish.
Conclusion
Smoothing is a crucial post-processing technique for FDM 3D printed parts, enhancing their appearance by eliminating layer lines and giving them a high-quality look. Smoothed ABS parts closely resemble molded or stereolithography parts. However, it is essential to exercise caution when during acetone ABS smoothing.
Acetone poses safety risks, including flammability and skin and eye irritation. Remember to take necessary precautions, like wearing a mask and gloves and working in a well-ventilated area. By following safety measures, acetone smoothing proves to be an effective way to enhance the visual quality of ABS parts. Contact us at RapidDirect today, and let’s discuss your vapor polishing needs.